How SmartNSF came to rescue in a heavily surveilled little (bird) house
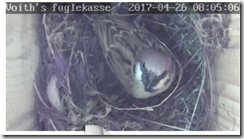
One small hobby project of mine is a birdbox with an wifi enabled IP Camera. Much more fun to watch those small house sparrows build their nest and see how hard they work to bring up new kiddo-birds ![]()
The images from the web camera surfaces on an web page, and everything worked fine last year.
However, firing up the camera this year, nothing showed up! After a quick look at the Chrome console, I quickly realized that the old and trusty IFRAME no longer worked as it used to. First and foremost I have enabled SSL on the site (with Let's Encrypt, using Windows ACME Simple (WACS), I'll create a blog post on that too in the near future) and it turns out that HTTPS won't allow IFRAMEs to use HTTP-based content at all. The concept is called "Mixed Active Content", read more about that here if interested. The built in web server on the web camera can't use anything else but plain old http …
While there probably are many other solutions to this challenge (feel free to chime in if you know!), this article describes how I used SmartNSF to call a small java-class, wrapping the whole HTTP-call nice and easy. A side effect was that I also could hide the inner workings of the IP camera completely! No more user name and password exposed in HTML ![]() .
.
If you don't know SmartNSF, it is very briefly an extension to both your Domino server and to your Designer client, enabling you to create powerful REST Services supporting full CRUD in minutes! While you of course can do much of the same with the built-in Domino Access Services (DAS), you have much better control with SmartNSF. In my opinion, one of the most important things to happen with Notes/Domino in years.
Read more to see how I enabled SmartNSF to solve this challenge!
Overall design
Since the old IFRAME wouldn't load HTTP-pages any more, I want to create a REST Service with SmartNSF that do the actual HTTP-call behind the scenes, and retrieve the images from the IP Camera. The image should be returned as an jpeg image to the caller, ie. the hosting web page. My goal is to have an URL like the following (note – this is not an active URL, just for documentation purposes);
https://blabla.com/yourdatabase.nsf/xsp/.xrest/image/large
The URL above would retrieve the "large" image, while the next URL would retrieve the "small" image for the mobile variant of the web site.
https://blabla.com/yourdatabase.nsf/xsp/.xrest/image/small
The most fascinating aspect of this solution, is that I now have absolute control over what and how the image would be generated! I imagine that this technique for example easily could be enhanced to create CAPTCHA images dynamically.
To achieve this, I need to do the following steps, which will be covered in detail later.
- Download and install SmartNSF
- Enable SmartNSF in the Domino database I want to host the REST Service
- Create a java-class based on the CustomRestHandler-class. This will contain the pepper in the solution!
- Create a SmartNSF route that connects the REST Services URIs like "Image" shown in the URLs above
Download and install SmartNSF
First of all, download an install SmartNSF both on Domino server and in your Notes client. SmartNSF also have a nifty Wiki here Which guides you through installation and usage.
Enable SmartNSF in database
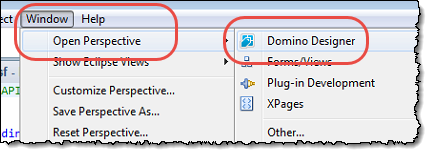
Before you dive into the database you want to enable SmartNSF in, remember that the so-called perspecive in Domino Designer plays a role whether you see certain design elements or not. The "Domino Designer"-perspective would be sufficient;
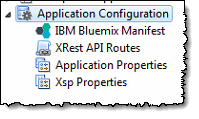
Why do this? There is always many ways to Rome, and if you do change the perspective, the navigator under "Application Configuration" would look like this;
In the screen shot above you see direct access to the "Xsp Properties", which is where you enable SmartNSF. Below I follow you through the "other way to Rome", if you don't change the perspective ![]()
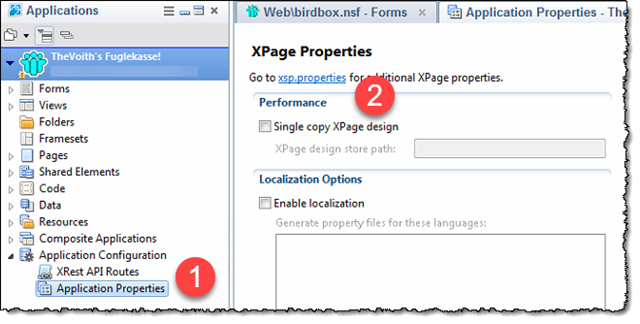
First you need to enable the SmartNSF to be active in your database. Follow the steps below to find the place to active SmartNSF;
Click on "Application Properties" (1). Choose the "Xpages" tab at the bottom on the window and then then on the "xsp.properties" link (2) as shown above. Also note that you have "XRest API Routes" just above "Application Properties" in the left navigator. This is where we later will set up SmartNSF.
When you click on "xsp.properties", the following screen is next;
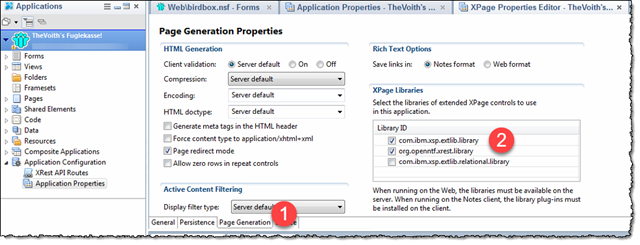
Click on the "Page Generation" tab at the bottom of the window (1). Then, marked by (2), check both "com.ibm.xsp.extlib.library" and "org.openntf.xrest.library". This is the part where you tell the database that you want SmartNSF in this database. Press CTRL + S to save and exit the documents above.
Create a java-class – this is where the code lives
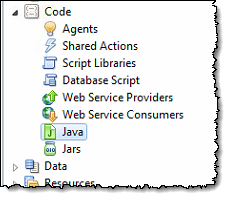
Remember to switch to the "Domino Designer" perspective if you haven't already done so. Otherwise you won't be able to see the "Java"-entry under the "Code"-section as seen below;
Click on the "Java"-menu and click on the "New Java Class" button as marked with (1) below;
A dialog box pops up, and you see that below;
There are two important fields to fill in in the dialog box above. Marked by (1) is the "Package name", which encapsulates your code and separates your code from anything else. Read more about java packages here if interested. Typical convention is to use the reversed domain name of yours as a prefix ("no.vcode" in my case) and whatever name like "image", "utils" or what you'd fancy.
Marked by (2) you enter the Java Class Name, "imageHandler" in my case. Press the "Finish" button.
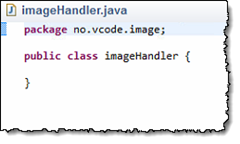
Domino will then create a little boilerplate code base for you, like this;
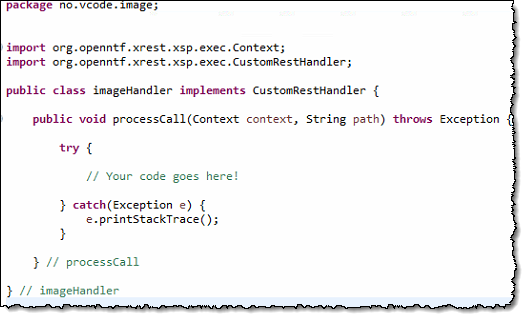
In order to make this a full fledged SmartNSF-enabled class capable of processing your SmartNSF calls, you enter code like this;
The code above is the absolute minimum, and it will work! But it doesn't do anything ![]()
The main thing to grasp from the sample code above is how I let my imageHandler implement the "CustomRestHandler" from SmartNSF.
Before you continue, you should know that the construct above gives you access to the context of the caller, meaning that you can access session-stuff and variables. In the other end you can write your stuff to the output stream of the REST Service. The result can be anything, such as JSON, XML or binary stuff like images, PDFs or whatever.
Since I work with images, I clearly need to import java libraries capable of working with images! Below you see my import-section
import java.util.Map;
import java.awt.image.*;
import java.io.*;
import java.net.URL;
import javax.imageio.*;
import org.openntf.xrest.xsp.exec.Context;
import org.openntf.xrest.xsp.exec.CustomRestHandler;
import com.ibm.commons.util.io.json.JsonJavaObject;
import com.ibm.commons.util.io.json.util.JsonWriter;
import com.ibm.domino.services.HttpServiceConstants;
Almost all following code is based on Javax's ImageIO class, which makes it a breeze to work with simple images. The other pars work with URLs to retrieve the image from my IP Camera.
Below is a complete and working processCall-method capable of processing the "large" image!
I have marked some interesting points in the code above:
1) Define some variables. The BufferedImage img is the object that will retrieve the image from the URL and stuff it's binary data directly to the output stream in step (6).
2) Create a JSON object in case of errors and create a map of the incoming variables from the caller context. Note the context.getRouterVariables() call, which let me get access to the the variables such as "large" during step (3).
3) Get the content of the variable "imageID" from the SmartNSF route. You will see this in the next section, but for now you need to know that this is what comes from the URL like https://blabla.com/yourdatabase.nsf/xsp/.xrest/image/large or https://blabla.com/yourdatabase.nsf/xsp/.xrest/image/small
4) The code block to process the "large" variable.
5) The url object contain the HTTP url I want to receive. Note that this is a HTTP URL and not a HTTPS URL. Also note that the any username or password needed now lives deep down in your code, and is not accessible to the caller like the old IFRAME HTML code. Great benefit! The ImageIO.read-call will do the heavylifting of retrieving the content of the URL, which is an JPG in my case. The result is stored in the img object. Also note that I set the contentType string to the MIME type "image/jpeg".
6) This block stuff the retrieved binary img-object, now holding the JPG file, into the output stream of the REST Service. First I use context.getResponse().setContentType(contentType) to set the content type (now "image/jpeg" in this case). Then I set the "X-Frame-Options" header to SAMEORIGIN. This isn't strictly necessary for this code, but was here when I tried to get IFRAME code to work ![]() Skip it if you don't need it.
Skip it if you don't need it.
Next the output stream itself is created with the line; OutputStream out = context.getResponse().getOutputStream(). As you see I get the output stream of the calling context.
Finally the img-object is written to the output stream with the line; ImageIO.write(img, "jpg", out).
7) This code block output a JSON object with an error if that occur.
8) Java catch blocks in case of java errors. I barely mentioned that I used some code above to test this construct within an IFRAME. The strange thing was that the overall REST Service worked fine when calling it directly. But from within an IFRAME a bunch of java exceptions occurred. Obviously something wasn't transferred properly when an IFRAME was the caller.
The code above has been slimmed down considerably to show the main steps to retrieve the image into the img-object, and how to relay that out to the calling SmartNSF CustomRestHandler. Please consider to robustify the code somewhat before putting into production ![]()
Future ideas for this concept;
- CAPTCHA
- Image handling, with the Import Image 2 Lotus Notes (II2LN) behind the scenes
- Generic image and/or file proxy, making it a breeze to have a single entry point for anything :-)
Hope this is helpful! Happy coding!
PS! Love java too!
Copy-pastable code – just for reference
The bare minimum code, which let my imageHandler class implement CustomRestHandler;
package no.vcode.image;
import org.openntf.xrest.xsp.exec.Context;
import org.openntf.xrest.xsp.exec.CustomRestHandler;
public class imageHandler implements CustomRestHandler {
public void processCall(Context context, String path) throws Exception {
try {
// Your code goes here!
} catch(Exception e) {
e.printStackTrace();
}
} // processCall
} // imageHandler
The complete code to process "large" variable;
package no.vcode.image;
import java.util.Map;
import java.awt.image.*;
import java.io.*;
import java.net.URL;
import javax.imageio.*;
import org.openntf.xrest.xsp.exec.Context;
import org.openntf.xrest.xsp.exec.CustomRestHandler;
import com.ibm.commons.util.io.json.JsonJavaObject;
import com.ibm.commons.util.io.json.util.JsonWriter;
import com.ibm.domino.services.HttpServiceConstants;
public class imageHandler implements CustomRestHandler {
public void processCall(Context context, String path) throws Exception {
// Image related
BufferedImage img = null;
String imageID = "";
String contentType = "image/jpeg";
boolean continueOutput = false;
// Create JSON-related variables
JsonJavaObject result = new JsonJavaObject(); // The outputted json
Map<String, String> mapVariables = context.getRouterVariables(); // The map of incoming URL-Paths such as
try {
// Get the image ID from the parameters
imageID = mapVariables.get("imageID").toString();
if (imageID.equals("large")) {
contentType = "image/jpeg";
URL url = new URL("http://192.168.x.x/yourimage.jpg?usr=username&pwd=password");
img = ImageIO.read(url);
continueOutput = true;
} // end if current ...
if (continueOutput == true) {
context.getResponse().setContentType(contentType);
context.getResponse().setHeader("X-Frame-Options", "SAMEORIGIN");
OutputStream out = context.getResponse().getOutputStream();
ImageIO.write(img, "jpg", out);
out.close();
}
else {
// Error, imageID not regognized
// OUTPUT the JSON stored in the result-variable
result.put("error", "Invalid imageID or internal error in imageHandler");
context.getResponse().setContentType(HttpServiceConstants.CONTENTTYPE_APPLICATION_JSON_UTF8);
JsonWriter jsw = new JsonWriter(context.getResponse().getWriter(),true);
jsw.outObject(result);
jsw.close();
}
} catch (IOException e) {
e.printStackTrace();
}
catch(Exception e) {
e.printStackTrace();
} finally {
}
} // processCall
} // imageHandler




Comments
Posted by Patrick Kwinten At 14:46:40 On 28.03.2018 | - Website - |