How to configure BitLocker so it doesn"t need 72 hours to encrypt 2 TB!
- Setting up BitLocker the wrong way can be extermely slow. For example – after 72 hours my 4 TB-drive was only 49% finished!
- Don’t encrypt harddisks full of files. Start with empty drive and enable BitLocker with “Encrypt used disk space only”
- Use USB 3 – otherwise BitLocker will be extremely slow!
My backup-regime
Albeit I – as a programmer – shouldn’t care too much about backup (haha!), I have always been at the cowards side and backuped everything. Over the years I have been trying out most ways to backup, such as;
- 1,44 MB diskettes – stacks of them!
- CD and DVD burners
- Zip and Jazz drives
- External harddisks of all kinds and sizes
- FTP to my NAS
- Online cloud backup such as Acronis True Image
Even though most of the technologies above does work to some extent, they have allways meant labor, time and cost of different degrees.
This post is about my latest backup-regime. It consists of an USB harddisk docking station for ordinary internal harddisks;
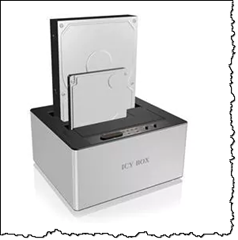
My model is the ICY BOX from RaidSonic. It swallows two harddisks, either 3,5” or 2,5”. By using these types of harddisks, the price goes down a whole lot, plus I already have a stack of older disks. One of the really cool features about this box, is that it can clone a harddisk, even without the hosting computer running.
The ability to clone is where the backup-aspect comes to play for me. By using a huge 4 TB harddisk as my main backup disk, I clone this from time to time to another similar 4 TB disk. I clone at intervals such as once a week. Then I store the cloned harddisk outside the premises.
This is where the need to protect the disk comes in. I don’t want unprotected disks lie around.
Searching the net brings up several candidates to protect an external harddisk. If you search around for best solutions to protect your external drive, you see that for example applications such as VeraCrypt or StorageCrypt are mentioned a lot. If you have Windows 10 Professional or Enterprise, you already have Microsoft’s own BitLocker. Note that you also need a fairly new computer with a security module in place (the so called “Trusted Platform Module” or TPM). Note that the BitLocker wizard will tell you if you miss anything.
Protection provided by tools like BitLocker comes with a price – mainly since protection is in the form of encryption. And that is time. Time to encrypt (and later decrypt) your stuff as you move files to and from your harddisk.
Read on to see how I have configured BitLocker now …

My first attempt to enable BitLocker – encrypting the whole harddisk … NOT!!!
BitLocker is pretty easy to use since it is already a part of Windows. During my first attempt I tried to encrypt the whole drive – full of files. It turned out that this is very time-consuming for my 4 TB disk. After 72 hours, the encryption process showed only 49 % finished! That means that my encryption time will be a whole week!! My bummer that I dind’t catch the following information ![]()
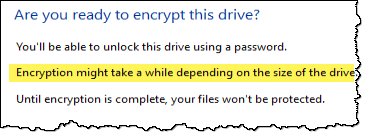
Luckily the encryption process can be paused.
My second attempt – encrypting only the used space – BETTER!
I realized that I can’t wait for a week to have the disk properly encrypted. Searching the net tipped me off that I could instead encrypt only the used space. On an empty 4 TB this would only take a couple of minutes. Below you find my step-by-step procedure on how I enabled my backup disk. Note that I had to reinitialize the disk from the Computer Management console instead of letting BitLocker decrypt the whole thing. To me it looked like the decryption process would take about the same time ![]()
In other words – my harddisk is empty when I start the prodedure below.
Turn on the BitLocker for your drive. One way to do this is simply right click on the drive and select “Turn on BitLocker” from the context menu;
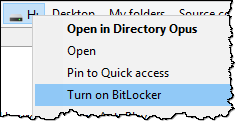
This will bring up the BitLocker-wizard which first analyze your drive and system (remember, the TPM must be in place too);

If the wizard doesn’t find any problems, you should be presented with a dialog box letting you choose how to unlock your drive later. Remember, the drive will be heavily encrypted, so you need either a password or a certificate-file somewhere.

I choose the password approach. The other approach is typically used if you want to store your certificate on an USB stick or similar. Next you must indicate where to store your recovery key. This must be somewhere other than the disk you are about to encrypt.

Next you need to choose what to encrypt. This is where I stepped wrong on my first attemt to enable BitLocker. Choose the “Encrypt used disk space only”.

Next you have to choose what kind of encryption you want;

If you need to use the USB harddisk on another machine, choose “Compatible mode”. I use the drive only on my main workstation, so I use “New encryption mode”. Clicking next brings up the last page of the BitLocker wizard;

Pressing “Start encrypting” starts the process and you will see the current progress like this;

Note the “Pause” button in case you don’t have time to wait ![]()
Finally you would get a dialog box like this;

You are now ready to use your BitLocker-potected external harddisk. Every time you mount it, Windows will ask you for the unlock-password. No password, no files ![]()
When you connect the harddisk again, you will clearly see that this is a protected drive in Windows. Right clicking at the drive icon gives you the possibility to unlock it;
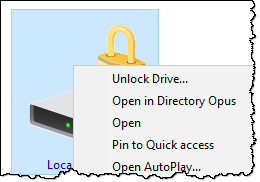
Selecting the “Unlock drive” and you’ll get the following dialog box;

… voila! your drive is unlocked ![]()

Aftermath
Things aren’t always a shiny as they appear!
A couple of things;
Speed
I am not in the process of copying my backup files to the encryped harddisk, and that is not very fast either ![]() . Of course Windows and BitLocker has to encrypt the files as they come onto the drive and that takes time. But … this seems to be along the same lines as during my first attempt?
. Of course Windows and BitLocker has to encrypt the files as they come onto the drive and that takes time. But … this seems to be along the same lines as during my first attempt?
It of course also has a lot to say what kind of hardware you run on. If you for example run on USB 2 instead of USB 3, that will slow down things considerably! Thus, I wanted to make sure that my harddisk docking station actually were connected to my USB 3 ports. That turned out not to be so easy to determine! The tool USB Tree View was a pretty quick tool to tell whether the harddisk is on super speed or not ![]() Below I can clearly see the little “S” on my disks;
Below I can clearly see the little “S” on my disks;
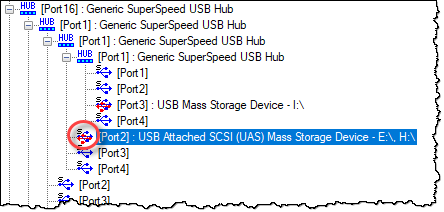
Note that the USB Tree View revealed that my drive indeed was NOT on Super Speed, and thus running USB 2. This was probably the direct cause for extremely slow BitLocker-performance!
"The parameter is incorrect (87)" after trying to unlock ?!?!
What!! Unlocking the drive seems to work just fine, but as soon as I try to access it via the Explorer, then I get an error stating “The parameter is incorrect (87)”. Duuuh! This is NOT OK. Searching the net, several tips suggests to run the command CHKDSK /F /R /X <your drive letter> as an Administrator. In my case the BitLocker-harddisk is mounted as drive H:. The command is thus;
CHKDSK /F /R /X H:
This also seemed to take a long time, so I aborted the whole thing (yup, CTRL + C …), but afterwards the drive was back on track! Suspicious! By the way – I am extactly 1 minute away from abandoning BitLocker here. I do not feel comfortable when super advanced tools like this gives me trouble! I will give it another try.
One thing I read somewhere, that BitLocker is definitely one of the reasons for undocking your external USB harddisks properly. You know, this little tool;
