How to create a filter working with USB devices in Retrokits RK-006
Are you playing around with MIDI? MIDI are almost like magic connecting music devices together, but not without challenges. Especially synchronization of clock signals turns out to be …mysterious, at times. The result of a MIDI Loop is often frozen transport and strange artifacts popping up in your soundspace.
This post focuses on a little nifty MIDI-unit named RK-006 from Retrokits which can be of tremendous help.
The RK-006 is a little MIDI Interface with 2 inputs and 10 outputs. It can both be connected to a computer and thus extend your DAWs number of MIDI ports. Additionally it can be a self-served MIDI Host in a setup, totally without a computer in a dawless setup. The ports can also do different things via configuration, and even send gate signals instead of MIDI if needed. A real Swiss-Army knife of MIDI! Search around the net and you’ll find several reviews, such as this one.
Going dawless
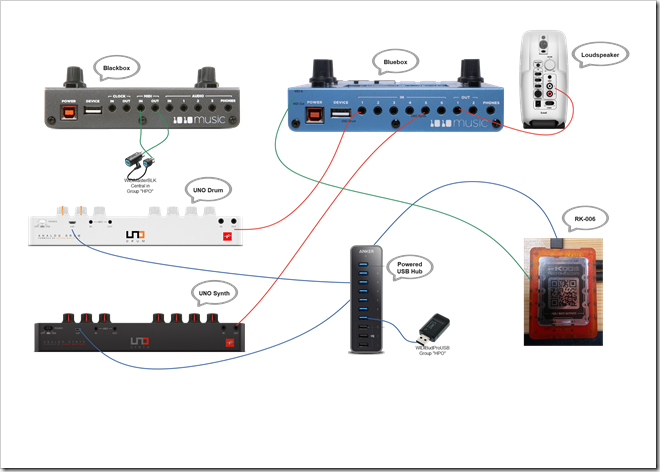
In my quest to create a little dawless setup, I have a UNO Synth and drum machine UNO Drum. The setup also involves a sampler Blackbox and a mixer Bluebox from 1010music.
My simplified wiring diagram looks like this:
Click on the image above for a large version. You can click on all images by the way!
As you see, both the UNO Synth and UNO Drum are connected to the USB Hub which again is connected to RK-006.
Read on to see how I solved a tricky MIDI loop in the wiring above!
Debugging where MIDI goes wrong
As mentioned before, MIDI routing can some times go haywire. In the setup above, I had some issues with MIDI CC flowing through the MIDI-land and messing up the sound playing on the UNO Synth. Very briefly the MIDI CC 21 coming from the UNO Drum due to step-modulation, flowed over into the UNO Synth, triggering “Filter Resonance” whenever I tweaked the Filter-knob on the UNO Synth. The meaning of CC 21 was found in the UNO Synth MIDI Implementation.
By using the old, but still very capable, MIDI tool named MIDI-OX, I could via the CME WIDI Bud Pro (the USB dongle connected to the RK-006 USB Hub) and a paired WIDI Bud Pro on my computer, track the traffic that happen on MIDI. Below is a little screenshot from the MIDI-OX, revealing that the UNO Drum indeed uses some modulation during its drum preset;
Figuring out what really happens on MIDI is essential when tracking down problems.
Another great tip which I got from Retrokits (Thanks G!), is to connect as few pieces together, and see what works or not. When you got it working, you add piece by piece.
Following this path of creating elimination tests, I discovered that the UNO Drum somehow seems to relay the MIDI clock- and clock transport onto the MIDI. This messed up stuff and by creating a filter in the RK-006, I was able to prohibit the UNO Drum from putting clock- and clock transport into the RK-006. This made all the other equipment work as planned, without having spooky CC 21’s floating around.
Configuring the RK-006
The RK-006 is configured via it’s webMIDI-API. This is a powerful API letting your browser connect- and configure the RK-006 if it is connected to a computer. In my case, I want to play dawless, so I use the iPhone App instead, connecting it directly with RK-006 via the Apple Lightning to USB Camera Adapter.
Start up the RK-006 App, will first search and then connect to the RK-006. You will see the current configuration of each port, it’s global status and all it’s filters. Note that it is easy to recall any of the firmware-based presets. This is also easy to do by just pressing a long press on the RK-006 single button. When it starts to blink, you can advance the preset-choice for every short press on the same button. When the LED is blinking at your favorite preset, perform a long press again to save it. However, it is even more easy in the App, as it also tells you what each preset do. In addition you can store two user presets too.
The RK-006 also supports up to five, stacked, filters. The purpose for the filters, are to limit what goes where. It can really help you out and fix MIDI loops (which happens when a device for example sends clock signals, and then receives them again … boink! … a frozen MIDI loop now exists!).
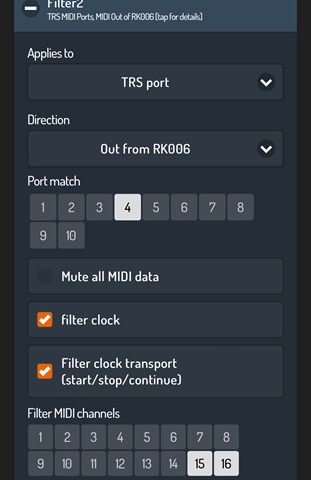
When you work with filters in RK-006, you will quickly see that you can work with both the IN and OUT ports, along side the 16 MIDI channels. Below I have chosen to work with a TRS-port:
Above I configure the filter to limit what goes out of the RK-006. I stop the clock and clock transport. In addition I also filter any MIDI message originating from MIDI channel 15 and 16.
Remember I found out that the UNO Drum acted a little funny? The UNO Drum is connected to the RK-006-connected USB Hub. Which port does that use? The genius people over at Retrokits has a solution for this too. By entering the so-called Vendor- and Product ID for the USB device itself, it can apply the filter on USB devices too!
Lets take a look at how that is done in the RK-006 App:
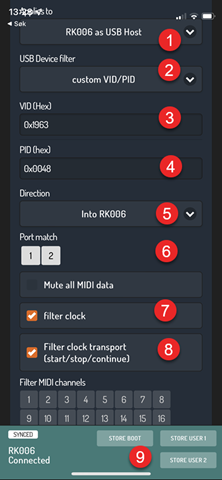
Marked by 1, I choose “RK006 as USB Host” from the dropdown.
Continue with 2, and choose the “custom VID/PID” from the dropdown. You see a bunch of music devices here, and Retrokits may even have added the UNO Drum and UNO Synth too when you read this! The “custom VID/PID” is at the very bottom of the list.
VID and PID?! This is the Vendor- and Product ID mentioned above. This is how each and every USB device is identified on your system! How on earth did I find the VID and PID of the UNO Drum? By using a little free tool called USB Device Tree Viewer you can see every hub and every device connected to your computer. This means that I connected my UNO Drum to my computer, and let Windows finish detecting it. Then USBtreeView is fired up and below is what I found:
Here I find the Vendor ID as 0x1963 and the Product ID to be 0x0048. These are the numbers I put into the VID and PID fields in RK-006 App, marked by 3 and 4!
Marked by 5, I choose where the filter should work, and I want to prevent the clock- and clock transport from entering my MIDI at all. I therefore choose “Into RK006”
Continuing with 6, I choose the Port 1 and 2. This is just to be sure that the current filter will work with any USB Hub. You can experiment with just choosing 1 or 2 too.
Continuing with 7, I choose to filter the clock signals, and similar for 8, away goes the clock transport.
Whenever you do changes in your settings, remember to store them. Marked by 9, you find the “STORE BOOT”, meaning that the current configuration will be saved and loaded each time the RK-006 restarts. Here you also see STORE USER1 and STORE USER2 to save your very own settings in case you need to rapidly change configuration.
There you are – a working MIDI-land, where everything starts- and stops as planned, and MIDI can be routed back and forth without messing up stuff!
Happy playing!


